Personal Care
1. Toileting
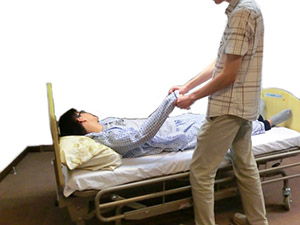
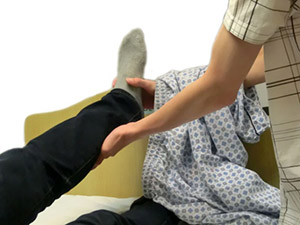
Toileting for Elderly (From bed to toilet / commode chair)
- Assist the elder to sit up in bed
- Face the elder
- The carer's feet should be positioned slightly wider than the elder's, while knees slightly bent and touches the elder's knees
- The carer supports the elder's head with his shoulder
- The carer's arms go beneath the elder's armpits, hands placing at the shoulder blades (fingers may interlock)
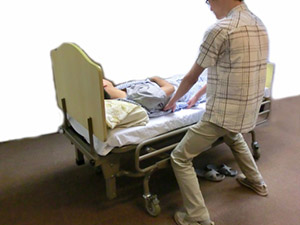
- Instruct the elder to stand up together upon counting from 1 to 3
- While counting to 3, leaning backwards to lift the elder up to standing firm
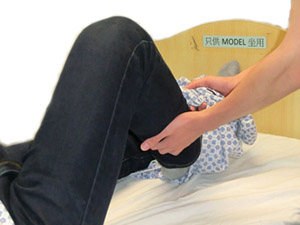
- Support the elder with one hand while lowering the elder's pants to beneath buttocks with another hand
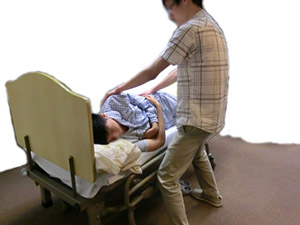
- Support the elder with both hands while assuming a squat stance, shifting both the carer and the elder’s body balance towards and facing the toilet/commode chair, then slowly position the elder onto it
- Instruct the elder to sit properly
- Make sure the elder sitting securely on the toilet / commode chair; use supportive equipment such as safety strap and/or standing aid if necessary
2. Bathing
Bathing for Elderly
- Prepare bathing accessories such as towel, sponge, liquid soap and shampoo as well as clothes; turn on the water heater
- Guide the elder to the bathroom; install showering bench for bathtub, and commode chair / showering chair for shower stall. Lead the elder to sit down in proper position; if the showering chair has wheels, lock them
- To avoid the elder catching a cold, close windows and doors as appropriate or use a bathroom heater. For old-typed gas water heaters, make sure there is proper ventilation
- Assist the elder to wash his or her face, neck and take off the clothes. Instruct the elder to grab the handles of the showering chair firmly; stand on the ground and carer assists to take off his or her pants; Or to instruct elder to sit on left side and lift right foot, carer/elder takes off the right side of pants to knee and vice versa, sit on central and slowly remove the pants completely
- Turn on the cold water tap first, the hot water tap next for suitable temperature; the carer tests the water temperature with the inner elbow, then let the elder test it again before bathing
- Apply liquid soap for the elder; clean the whole body with a small towel or sponge, especially skin folds, genital area and groin
- Let the elder wash the genital area by himself or herself if feasible
- Support an armpit of the elders so he or she slightly leans forward, then wash his or her buttocks with the other hand
- Turn off the water when bathing is finished; turn off hot water first, cold water next
- Dry the elder's body with a towel; apply lotion if necessary
- Assist the elder to put on the clothes shortly to avoid catching cold
- Instruct the elder to hold the handles of the showering chair; the carer propels himself with both feet on the ground to pull the pants to waist level for the elder; dry the seat with a towel and help the elder sit down
- Guide the elder back indoors to the proper place
- Turn off the water heater; check the switches and heater for safety
3. Dressing
Assist the elder to change clothes. For example of stroke patient, normal limbs are on one side while weak limbs are on the other:
3.1 Dressing in Bed
3.1.1 Dressing and Undressing Separately
Undressing
- The carer stands by the elder’s normal limb
- Unbutton the elder's shirt and loosen the collar
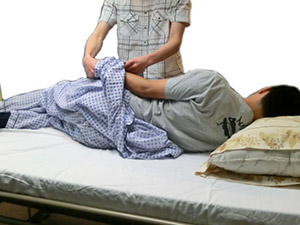
- Take the sleeve on the normal side off; instruct the elder to bend the normal arm for assistance (photo 1)
- Roll the part taken off beneath the elder's body (photo 2)
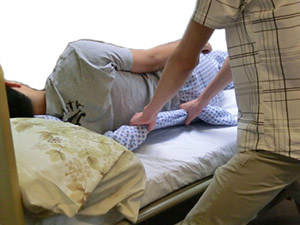
- The elder lies on his or her back; assist the elder to put both hands to the abdomen, with the outside (weak) leg placed on the inside (normal) leg
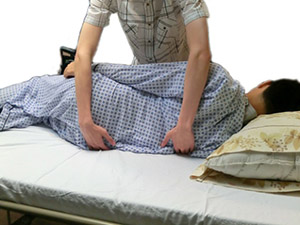
- The carer presses on the elder's outside shoulder with one hand and the outside hipbone with the other hand to turn him or her to facing the carer into side-lying position (photo 3)
- The carer lifts the elder up with one hand while taking the dirty shirt beneath the elder with the other (photo 4)
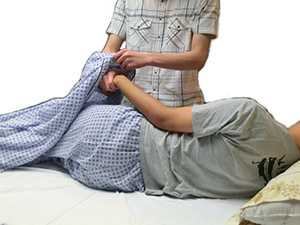
- Take the sleeve on the weak side off (photo 5)
- Keep warm and avoid pulling the weak shoulder
- Continue to dressing
Dressing
- The elder lies on lateral side
- Place the clean shirt on the elder
- The carer extends his arm into a sleeve and pulls the elder's arm though the sleeve (photo 6)
- Roll the other side of the clean shirt beneath the elder's back (photo 7)
- Press on the elder's shoulder with one hand and hipbone with the other to assist the elder to lie on back
- Press on the elder's inside shoulder with one hand and inside hipbone with the other so the elder lies on the other side
- Pull out the part of the clean shirt rolled beneath the elder's back (photo 8)
- Put on the sleeve on the normal side of the elder; you may ask for the elder's assistance (photo 9)
- Presses on the elder's shoulder with one hand and hipbone with the other to assist the elder to lie on back
- Button up
3.1.2 Dressing and Undressing at the Same Time
Undressing
- The carer stands on the normal side of the elder
- Unbutton the elder's shirt and loosen the collar
- Take the sleeve on the normal side off; instruct the elder to bend the normal arm for assistance (photo 1)
- Roll the part taken off beneath the elder's body (photo 2)
- The elder lies on his or her back; assist the elder to put both hands to the abdomen, with the outside (weak) leg placed on the inside (normal) leg
- The carer presses on the elder's outside shoulder with one hand and the outside hipbone with the other hand to turn him or her to facing the carer into side-lying position (photo 3)
- The carer lifts the elder up with one hand while taking the dirty shirt beneath the elder with the other (photo 4)
- Take the sleeve on the weak side off (photo 5)
- Keep warm and avoid pulling the weak shoulder
- Continue to dressing
(photo 1) |
(photo 2) |
(photo 3) |
(photo 4) |
(photo 5) |
|
Dressing
- The elder lies on his or her side
- Place the shirt on the elder
- The carer extends his arm into a sleeve and pull the elder's weak arm into it (photo 6)
- Roll the other side of the clean shirt beneath the elder's back (photo 7)
- Press on the elder's shoulder with one hand and hipbone with the other to assist the elder to lie on back
- Press on the elder's inside shoulder with one hand and inside hipbone with the other so the elder lies on the other side
- Pull out the part of the clean shirt rolled beneath the elder's back (photo 8)
- Put on the sleeve on the normal side of the elder; you may ask for the elder's assistance (photo 9)
- Press on the elder's shoulder with one hand and hipbone with the other to assist the elder to lie on back
- Button up
(photo 6) |
(photo 7) |
(photo 8) |
(photo 9) |
3.1.2 Dressing and Undressing At the Same Time
- The carer stands on the normal side of the elder
- Unbutton the elder's shirt and loosen the collar
- Take the sleeve on the normal side off; instruct the elder to bend the normal arm for assistance
- Roll the part taken off beneath the elder's body
- Place the shirt on the elder
- Put on the sleeve on the normal side of the elder; you may ask for the elder's assistance
- Roll the other side of the shirt as much as possible beneath the elder's back
- The elder lies on his or her back; assists the elder to put both hands to the abdomen, with the outside (weak) leg placed on the inside (normal) leg
- The carer presses on the elder's outside shoulder with one hand and the outside hipbone with the other hand to turn him or her to facing the carer into side-lying position
- The carer lifts the elder up with one hand while taking the shirt beneath the elder with the other
- Take the sleeve on the weak side off; avoid pulling the weak shoulder
- Put on the sleeve on the weak side; the carer extends his arm into a sleeve and pulls the elder's weak arm into it, then presses on the elder's shoulder with one hand and hipbone with the other to assist the elder to lie on back
- Button up
- Keep warm
3.2 Changing Pants in Bed
3.2.1 Taking off Pants
- The elder lies on his or her back in the bed
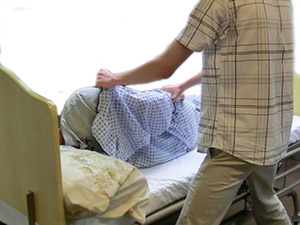
- Instruct the elder to bend his or her knee on the normal side, then slightly lift the waist and hip (photo 10)
- The carer pulls the elder's pants to beneath hip level (photo 11)
- (If the elder cannot lift his or her waist and hip, pull one side of the pants down to hip level, then the other side)
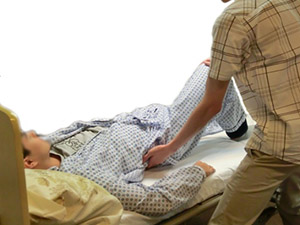
- Pull the pants down to calf level
- Take off the pants; you may instruct the elder to lift the normal foot in order to take off that side first (photo 12)
- The carer lifts the elder's weak calf and take off the pants
(photo 10) |
(photo 11) |
(photo 12) |
|
3.2.2 Putting On Pants
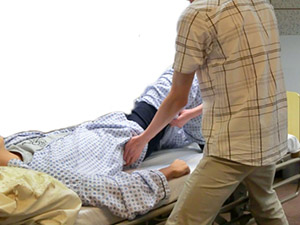
- The carer extends an arm into a pant leg, and grabs the week foot to put the pant leg onto the weak leg (photo 13)
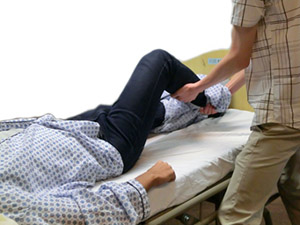
- Put on the pant leg on the normal side (photo 14)
- Pull the pants to hip level
- Instruct the elder to bend his or her knee on the normal side, then slightly lift the waist and hip
- Put on the pants completely
- If the elder cannot lift his or her waist and hip, pull one side of the pants up to hip level, then the other side
- Smooth out the wrinkles on the back of the elder's shirt and pants
- Make the elder comfortable
(photo 13) |
(photo 14) |
4. Changing Position
4.1 Assist the elder to sit up in bed
- The carer stands beside the elder's bed; adjust bed level if possible for proper lifting.
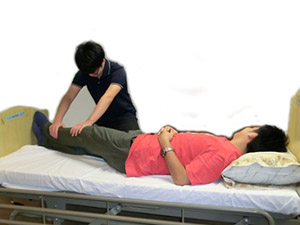
- The elder lies on his or her back; the carer assists the elder to put both hands to the abdomen, with both knees bent or the outside leg placed on the inside leg (photo 15)
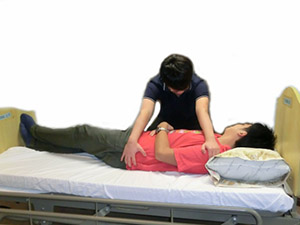
- The carer presses on the elder's outside shoulder with one hand and the outside hipbone with the other hand to turn him or her to facing the carer into side-lying position (photo 16) (The carer's spine must remain straight)
- Move the elder's legs to the outside of the bed
- Instruct the elder to push on the mattress with one hand to support the upper body up upon counting from 1 to 3
- At the same time, the carer lifts the elder up with one hand lifting the elder's inside elbow and the other hand pressing on the outside hipbone (photo 17)
- Instruct the elder to push onto the side of the bed; the carer supports the elder with hands on shoulders to sit with proper balance
(photo 15) |
(photo 16) |
(photo 17) |
|
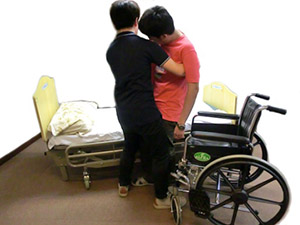
4.2 Transferring from Bed to Chair or Wheelchair
- Place the wheelchair beside the foot of the bed at an angle of 45°; lock the brake of the wheelchair
- Move/remove the pedals of the wheelchair
- Assist the elder to sit at the side of the bed
- Face the elder with your eyes fixed on the chair/wheelchair
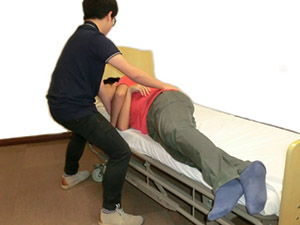
- The carer's feet should be positioned slightly wider than the elder's, knees slightly bent and touching the elder's knees (photo 18)
- The carer supports the elder's head with his shoulder
- The carer's arms go beneath the elder's armpits, hands placing at the shoulder blades (photo 19), fingers may interlock; instruct the elder to stand up together upon counting from 1 to 3
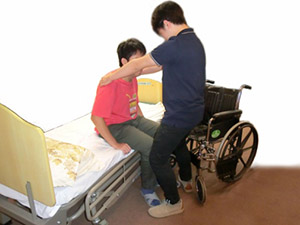
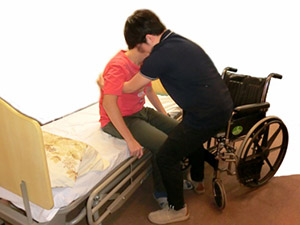
- The carer counts from 1 to 3 while leaning backwards to lift the elder up (photo 20)
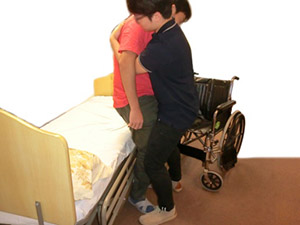
- The carer supports the elder while assuming a squat stance, leading his/her weight together with the elder with lower body's strength to facing the wheelchair, then slowly position the elder onto it (photo 21)
- Before allowing the elder sits down, make sure his or her legs are touching the side of the chair and wheelchair
- Assist the elder to sit properly in the wheelchair with both feet on the pedals; fasten the safety belt
(photo 18) |
(photo 19) |
(photo 20) |
(photo 21) |
Videos
5. Stoma Care
1. Objectives
- To prevent infection
- To keep the skin around the stoma dry
- To maintain the patient's comfort
2. Accessories for Changing Ostomy Pouch
The common ostomy pouches are closed ones that feature a paste that acts as skin barrier and a carbon filter for deodorisation.
Instructions:
- Replacement ostomy pouch (one-piece)
- Items needed:
- One-piece closed ostomy pouch (with skin barrier paste)
- Scissors
- Stoma measurement guide
- Warm water
- Paper towel/cleaning wipes
- Disposable bag
- Steps:
- Wash your hands
- Remove the old ostomy pouch and skin barrier paste; press the skin around the stoma while removing to avoid injury
- Put the used ostomy pouch and skin barrier paste into the disposable bag
- Clean the stoma and the surrounding skin with paper towel saturated with warm water or cleaning wipe, then wipe it dry
- Start cleaning from the middle of the stoma to the outer area in circles
- Measure the size of the stoma with the guide and trace the size on the skin barrier behind the replacement ostomy pouch. The opening of the skin barrier paste should be 2 mm wider than the stoma
- Cut the skin barrier paste being the ostomy pouch into a circle
- Remove the backing of the skin barrier paste; put on the pouch onto the stoma; gently press the skin barrier paste to make sure it has good contact with the skin
- Wash your hands
- Changing Frequency
- Change daily according to needs
3. Stoma Care Tips
- The skin barrier and the opening of the ostomy pouch should be 1 to 2 mm bigger than the stoma
- There are many blood capillaries on the stoma that can be easily damaged in the process of cleaning. Bleeding is common and can be treated by gently pressing with a wet paper towel. Patient should seek doctor's treatment if blood is found on stools or bleeding from stoma.
- The colour of the stoma is red as liked as lips. If the colour changes to blue or black, see medical treatment immediately.
Do not use antiseptics to clean the stoma or surrounding skin, in order to avoid irritation and dry skin.
6. Application of Wheelchair